Linux Server Installation
This guide walks you through installing HCPI on a Linux server (Ubuntu 20.04 LTS or later recommended).
Step 1: Update System Packages
Step 2: Install System Dependencies
Install required packages:
sudo apt install -y git python3 python3-pip python3-dev python3-venv \
    postgresql postgresql-contrib libpq-dev \
    build-essential libssl-dev libffi-dev libxml2-dev libxslt1-dev \
    zlib1g-dev libjpeg-dev libsasl2-dev libldap2-dev \
    node-less npm wkhtmltopdf unzip
Step 3: Configure PostgreSQL
Create a PostgreSQL user and database for HCPI:
sudo -u postgres createuser -s hcpi
sudo -u postgres psql -c "ALTER USER hcpi WITH PASSWORD 'your_secure_password';"
sudo -u postgres createdb -O hcpi hcpi
Database User
We're using hcpi as both the database name and username. You can choose different names, but make sure to update the configuration file accordingly.
Step 4: Create Directory Structure
Create the HCPI directory structure:
Custom Installation Path
If you choose a different path than /opt/hcpi, you'll need to update the paths in the configuration file (see Step 7).
Step 5: Set Up HCPI Files
Pick one of the three options below. See Getting the Code for the full picture if you're unsure.
For new instances on a fresh server. You'll start with an empty database and create a hcpi.conf from a template.
Request access from mkakinyi@eachq.org, then:
mkdir -p /opt/hcpi/custom /opt/hcpi/log /opt/hcpi/conf
cd /opt/hcpi/custom
git clone --branch 18.0 https://github.com/East-African-Community-HCPI/HCPI.git
Create /opt/hcpi/conf/hcpi.conf using the minimal template on Getting the Code. Skip the DB restore step (Step 8) — start with Option B in that step.
For migrating an existing instance. Assumes you've already produced hcpi-files.zip via the extraction guide. Copy it into /opt/hcpi (e.g. via scp from your Windows machine, or wget from wherever you've staged it), then:
Then for all options, clone Odoo 18 (a separate command so you can re-run it on its own if the download fails partway):
After this, you should have:
/opt/hcpi/
├── conf/          # Configuration files (from zip, or created from template)
├── custom/        # Contains HCPI modules
│   └── HCPI/      # Main HCPI modules
├── log/           # Log files (created)
├── odoo/          # Odoo 18 codebase (cloned)
└── venv/          # Python virtual environment (will create next)
Step 6: Set Up Python Virtual Environment
Create and activate the virtual environment:
Install Python dependencies:
NumPy Requirement
NumPy is required for HCPI but not included in Odoo's default requirements, so we install it separately.
Step 7: Configure Odoo
The configuration file is already provided in /opt/hcpi/conf/hcpi.conf. Review and update the following settings:
Key settings to update:
[options]
; Set this to match the PostgreSQL password from Step 3
db_password = your_secure_password

; UPDATE THESE PATHS if you installed to a different location than /opt/hcpi
addons_path = /opt/hcpi/odoo/addons,/opt/hcpi/custom/HCPI
logfile = /opt/hcpi/log/hcpi.log

; Change this if port 9201 is already in use
http_port = 9201
Important
- db_password: Must match the PostgreSQL password you created in Step 3
- Paths: Update
addons_pathandlogfileif you chose a different installation location - http_port: Change if port 9201 is already in use
About admin_passwd
The config from your export already has an admin_passwd set — that's the master password for database management operations (backup, restore, drop via Odoo's database manager UI). Leave it as-is to keep using the source instance's value, or change it here if you want a different one. It's not related to user logins, just DB-level admin actions.
Step 8: Set Up Your Data
Pick one of the two options below. Both are equally valid — your choice depends on whether you have an existing database to clone from, or want to start fresh.
Option A: Restore from an existing instance (recommended if you have the files)
A full restore has two parts that must both be done: the database, then the filestore. Missing the filestore will leave broken attachments and images in the restored instance.
A1: Restore the database
Use the hcpi.dump file produced by the extraction guide (PostgreSQL custom format):
Enter the hcpi user password when prompted.
Re-running the restore / getting 'already exists' errors
pg_restore expects an empty database. If you're running it a second time — because the first run failed partway, or you want to start over — you'll see errors like relation "..." already exists or constraint "..." already exists, because the tables from the first attempt are still there.
The cleanest fix is to drop the database and recreate it empty, then re-run the restore:
Step 1. Make sure Odoo isn't running (it holds a DB connection that blocks the drop). If Odoo is running in another terminal, stop it with Ctrl+C.
Step 2. Drop the old database:
Step 3. Recreate it empty, owned by the hcpi user:
Step 4. Re-run the restore (same command as above):
If dropdb fails with "database is being accessed by other users", some process still has a connection. Close any running psql sessions, stop Odoo, and try again. As a last resort, force-close other connections:
sudo -u postgres psql -c "SELECT pg_terminate_backend(pid) FROM pg_stat_activity WHERE datname='hcpi' AND pid <> pg_backend_pid();"
sudo -u postgres dropdb hcpi
After the fresh restore, also wipe the filestore if you're re-importing from scratch — otherwise you'll have orphan files from the previous attempt mixed in with the new ones:
Then re-do the A2 filestore step below.
Why -h localhost?
Without it, pg_restore uses the Unix socket and PostgreSQL tries peer authentication — matching your Linux username to a PostgreSQL user of the same name. Unless you're logged in as the hcpi Linux user, peer auth fails. -h localhost forces TCP, which uses password auth instead.
If you have a plain hcpi.sql file instead (legacy)
Older exports sometimes ship as a plain SQL file inside hcpi-db.zip. The current extraction flow does not produce this — if you have one, it's from an older process.
A2: Restore the filestore
The filestore goes under the user that will run HCPI — typically your current user, not the source server's user. Odoo looks for it under the current user's HOME at ~/.local/share/Odoo/filestore/<db_name>.
mkdir -p ~/.local/share/Odoo/filestore
cd ~/.local/share/Odoo/filestore
unzip /path/to/hcpi-filestore.zip
After unzipping, confirm the folder name matches your db_name:
If you run HCPI as a different system user (e.g. via systemd)
Odoo reads the filestore from the HOME of the user the Odoo process runs as. If you configured a dedicated hcpi system user in the service file later, move the filestore there:
Option B: Start with Empty Instance
If you want a fresh HCPI instance with just the modules, skip this step entirely — no database restore, no filestore. Odoo will initialize an empty database when you first run it with the -i HCPI flag (see Step 9).
Step 9: Start HCPI
Start Odoo with the HCPI configuration:
Start HCPI
Whether you restored from a dump (Step 8 Option A) or will start fresh in a moment, the command to run HCPI is the same:
Every time you want to run HCPI going forward, use this command.
Used empty database (Option B)? Do this once first
If you skipped the restore step and are starting with an empty database, you need a one-time initialization command to install the HCPI module into the fresh DB:
-i HCPI tells Odoo to install the HCPI module (and its dependencies) into the empty database. --stop-after-init runs the install and exits cleanly. Run this once, then start HCPI normally with the command above.
First-time startup can take 1–3 minutes
On the very first run, Odoo builds asset bundles (JS/CSS) and populates base data. Subsequent starts are much faster. Watch the log for HTTP service (werkzeug) running on ... port 9201 — that's your cue it's ready.
odoo-bin fails to start — common causes
Read the last lines of the traceback; the error type below usually tells you what's wrong.
psycopg2.OperationalError: ... Peer authentication failed for user "hcpi"
Peer auth needs the Linux user running Odoo to match the PostgreSQL username. If they don't match, either run Odoo as the hcpi Linux user, or set db_host = localhost in hcpi.conf to force TCP + password auth.
psycopg2.OperationalError: FATAL: password authentication failed for user "hcpi"
db_password in hcpi.conf doesn't match what PostgreSQL has. Reset it:
could not connect to server: No such file or directory
PostgreSQL isn't running. sudo systemctl start postgresql.
ImportError / ModuleNotFoundError
Your venv isn't active or a dependency is missing. source venv/bin/activate then pip install -r odoo/requirements.txt.
Module HCPI or queue_job not found
The addons_path in hcpi.conf is wrong, or modules are missing from custom/HCPI/. Confirm ls custom/HCPI/ shows the expected module folders (including queue_job).
Port 9201 already in use
sudo ss -ltnp | grep 9201, then either kill the owner or change http_port in hcpi.conf.
Step 10: Configure Firewall
Allow access to the HCPI port (default 9201):
Step 11: Access HCPI
Open your web browser and navigate to:
Or if accessing remotely:
First Load May Be Slow
The first time you access HCPI, the page may take 30-60 seconds to load as it initializes the interface. After this initial load, performance should be normal.
Sign in
If you restored from an existing database (Option A in Step 8): sign in with the same credentials you use on the source instance's web version — the users from the source DB are in your restored copy.
If you started empty (Option B in Step 8): Odoo created a default admin user. Log in with:
- Email:
admin - Password:
admin
Then immediately change it: top-right user menu → My Profile → Preferences → change the password. For a real deployment, also create a second admin-level user (Settings → Users & Companies → Users) so you don't get locked out if you lose the admin account.
Fix Missing Icons
If you notice missing icons in the interface after installation:
Before (missing icons):
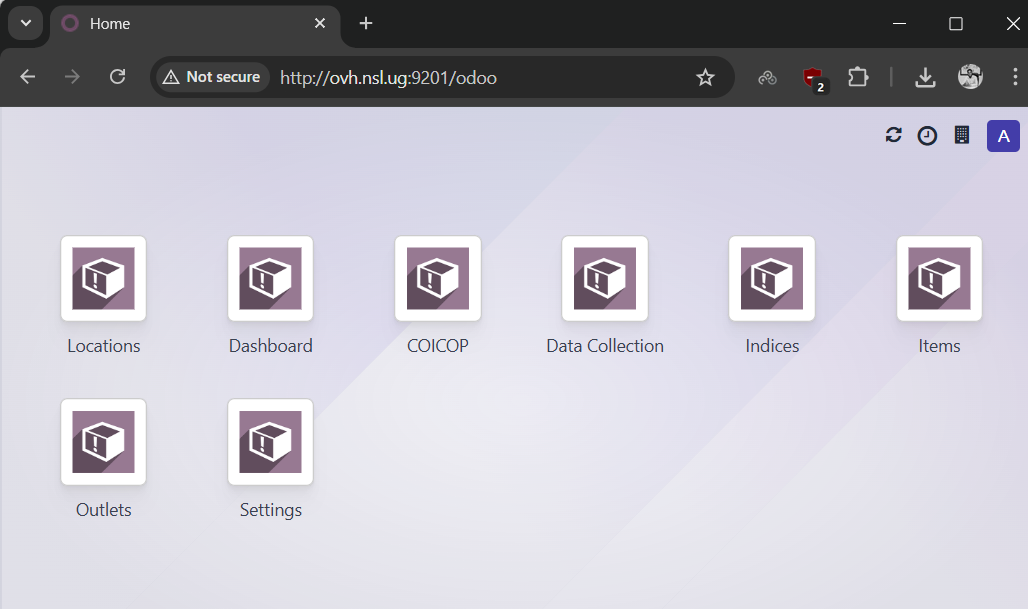
To fix:
- Click on your username in the top right
- Go to Settings → Activate the developer mode
- Then go to Settings → Technical → User Interface → Regenerate Assets Bundles
- Refresh the page
After (icons restored):
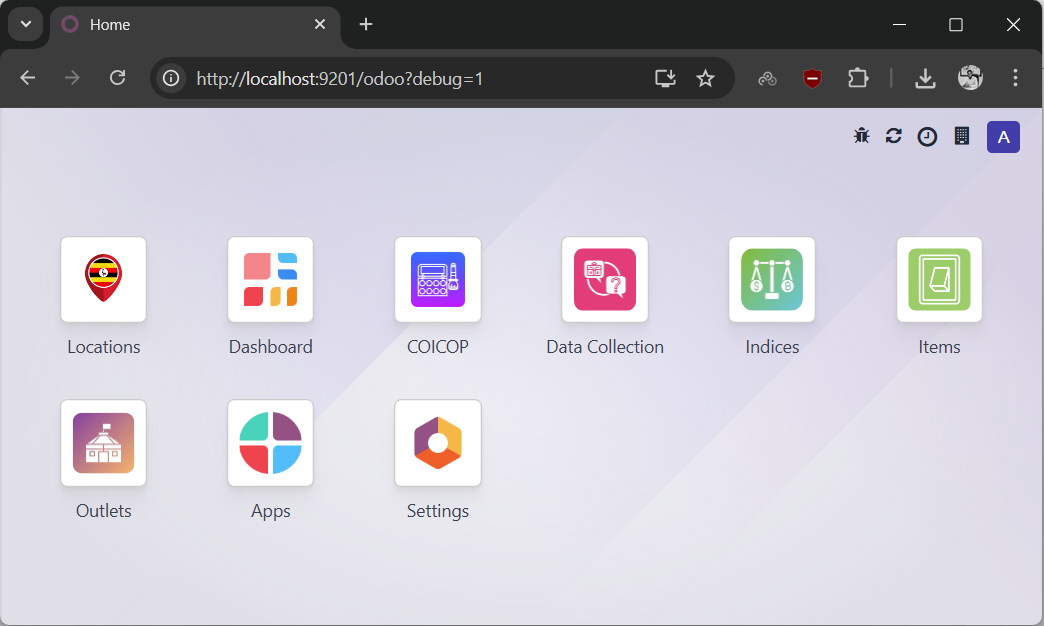
Alternatively, you can restart HCPI with the asset regeneration flag:
Running as a Service (Recommended for Production)
Create a systemd service file for automatic startup:
Add the following content (update paths if you used a different location):
[Unit]
Description=HCPI Odoo Service
After=network.target postgresql.service

[Service]
Type=simple
User=your_username
Group=your_username
WorkingDirectory=/opt/hcpi
Environment="PATH=/opt/hcpi/venv/bin"
ExecStart=/opt/hcpi/venv/bin/python /opt/hcpi/odoo/odoo-bin -c /opt/hcpi/conf/hcpi.conf
Restart=on-failure
RestartSec=10

[Install]
WantedBy=multi-user.target
Replace your_username with your actual username, then enable and start the service:
Check service status:
Troubleshooting
Check Logs
View HCPI logs:
Service Issues
If the service fails to start:
Port Already in Use
If port 9201 is already in use, change it in /opt/hcpi/conf/hcpi.conf:
Then restart the service or HCPI.
Database Connection Issues
If you get database connection errors, verify:
# Check PostgreSQL is running
sudo systemctl status postgresql

# Test database connection
psql -U hcpi -d hcpi -c "SELECT version();"
Module Not Found
If HCPI module is not found, verify the addons_path in the config file points to the correct location:
Next Steps
HCPI is now running on your server. To start working with the code:
➡️ Understanding the Codebase — a map of what's where and how to find things.
Then:
➡️ Making Your First Edits — small, safe changes to build confidence.
For production hardening:
- Set up SSL/TLS with Apache or nginx as a reverse proxy
- Configure regular database backups
- Review the Odoo 18 documentation for advanced configuration
- Configure user accounts and permissions in HCPI